 Contact sales:


 German

Setting up the SalesViewer® integration for HubSpot
With the native integration of SalesViewer®, you can bring identified company data directly and automatically into your HubSpot CRM. This allows you to trigger targeted marketing and sales processes and track leads even better. In this guide, we will show you step by step how to establish the connection and make the best use of it.
The setup guide: Authorization (OAuth) of SalesViewer® in HubSpot
- Log in to SalesViewer® and select the project you would like to connect. Then click on your initials (or your profile picture) at the top right and go to the “Integrations” menu item.
- Select the HubSpot integration and click on “Connect”. In the next step, authorize SalesViewer® to send data to your HubSpot account by logging into your HubSpot account as usual. Please also ensure that you have sufficient rights in your HubSpot account.
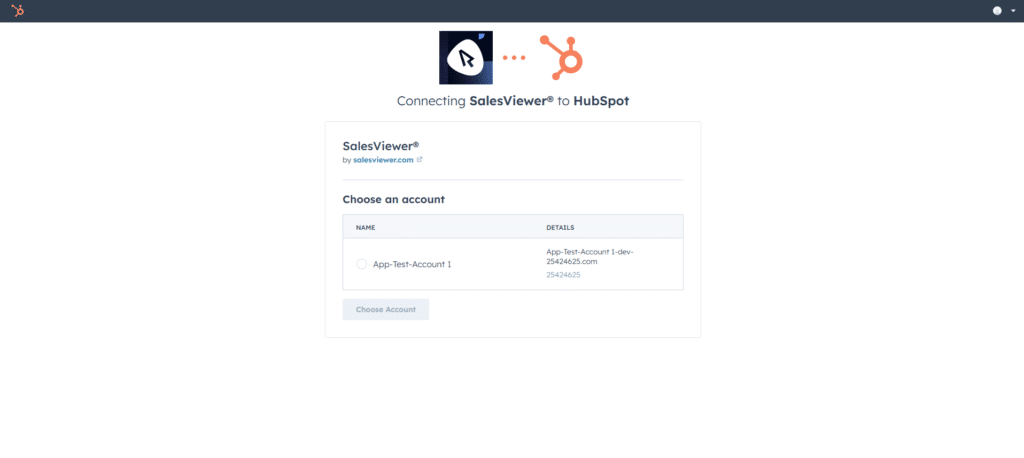
- After logging in, please select a HubSpot account into which you would like to integrate the SalesViewer® data. This step is important if you have or manage several HubSpot accounts. In the last step, click on “Connect app” to authorize the integration. You will return to the HubSpot integration overview in SalesViewer® and see that the integration is now active.
SalesViewer®: The integration overview
- On the integration overview, you can also select the company type that the data from SalesViewer® will receive as standard in your HubSpot account. The suggested company types come automatically from your HubSpot account and are not created in SalesViewer®. If you do not make a selection, the company type field in HubSpot will remain empty. This also applies to the email field, which you can select optionally if you have created a corresponding field in your HubSpot account. You also have the option of transferring the assignment of employees. This means that employees you have assigned in SalesViewer® are transferred to HubSpot based on their email address. The assignment is then also made there if the address could be successfully matched in your HubSpot account.
- Finally, select whether the companies in SalesViewer® should be synchronized manually or automatically with your HubSpot account. With manual synchronization, only the companies you have selected/exported in advance are synchronized continuously (hourly) with your HubSpot account. With automatic synchronization, either all companies or filter-based companies are continuously (hourly) created (if non-existent) and synchronized with your HubSpot account.

HubSpot: Activities & Company Properties
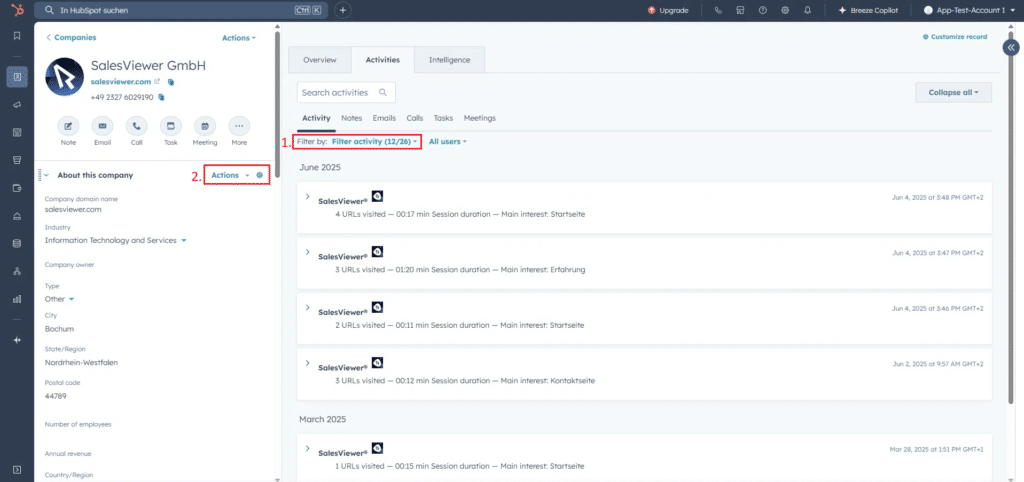
- To make the SalesViewer® activities visible in HubSpot, you must activate the newly generated filter “Integrations: SalesViewer®“ by clicking on ”Filter by: Filter activities” and selecting it there. From now on, all SalesViewer® activities will be displayed in all company overviews. (1.)
- In addition, you can now add the new SalesViewer® company properties at company level. These company properties can also be used for HubSpot lead scoring. To do this, click on “Actions” in the company properties on the left-hand side of a company profile, click on “Show all properties” and then select the relevant SalesViewer® fields. (2.)
Transferring companies to the HubSpot CRM
- During configuration, you can decide whether companies in SalesViewer® are synchronized manually (via the three-dot menu) or automatically with your HubSpot account on an ongoing basis. With manual synchronization, only companies that have been manually transferred and their data are synchronized with your HubSpot account on an ongoing basis (hourly). With automatic synchronization, either all companies or filter-based companies are continuously (hourly) transferred to your HubSpot account and synchronized. The filter must first be created in SalesViewer® at the session level.
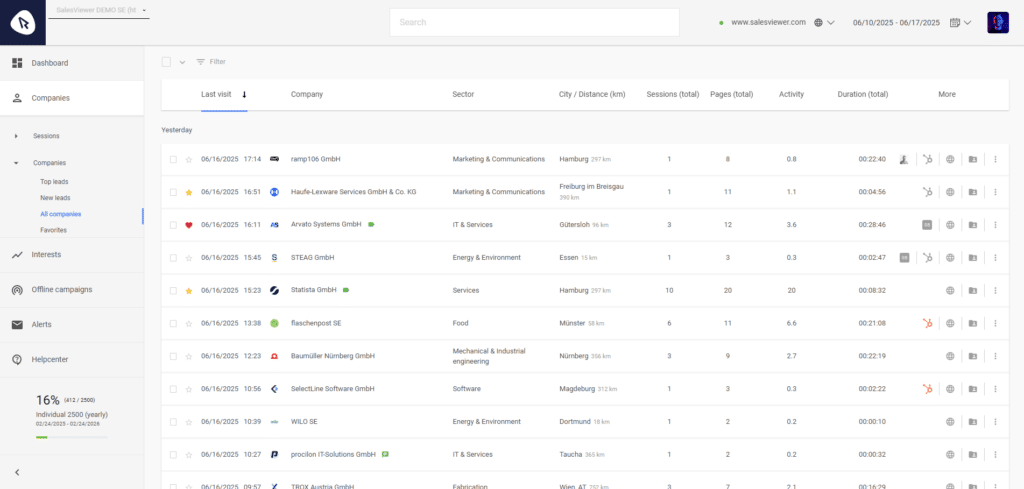
- If a company is activated for synchronization, all SalesViewer® data and visits are continuously synchronized with this company in your HubSpot account. You can recognize the active synchronization by an orange HubSpot icon that appears on the data record next to the 3 dots. Of course, synchronization can be deactivated for each company at any time or linked to another company data record in your CRM.
- A grey HubSpot icon appears on the data record if SalesViewer® has successfully recognized this company in your HubSpot account, but synchronization is not active.
Frequently asked questions
What happens if I have several data records for the same company in the CRM?
During synchronization, SalesViewer® performs a data comparison that primarily checks the domain in addition to the company name. If there are multiple matches in the CRM, the gray HubSpot icon is displayed, allowing you to manually select the correct data record to which the activities from SalesViewer® should be transferred.
What do I do if a SalesViewer® lead is synchronized with the wrong data record in the CRM?
In SalesViewer®, the connection to the CRM can be removed again via the three-dot menu on the right for the respective company. Once the link has been removed, a new connection can be created via the same menu.
What exactly is meant by “E-Mail-Property in HubSpot” in the configuration?
As there is no email field at company level in HubSpot by default, a user-defined field must be created manually in advance and a name assigned to this field. Since the names of the fields are individual or several such fields may exist, a field can be selected in the configuration into which the e-mail address of the respective company is to be transferred. If no transfer is required, the field can simply be left empty.
Why can’t I see the “Integrations” menu item in the SalesViewer®?
Before the native integration with HubSpot CRM can be established, it must first be ensured that the respective user has sufficient rights in SalesViewer®. Only users with admin rights can access the integration menu.
